Author

Frank

Start with what you actually need

Look, if you’re buying a desktop 3D printer for production use, don’t chase specs you won’t use. Ask what parts you make, how many you need per week, and which failures cost you time. If you need help mapping those requirements to hardware and slicer settings, ask for 3d print support early — it saves wasted runs and weird surprises.

Questions that narrow the field fast

Be blunt with yourself: do you need fine surface finish, chemical resistance, heat tolerance, or sheer speed? Size parts to job volume, not to wishful thinking. Pick materials first, then printers. Small build volume with tight tolerances beats a big box that can’t hold dimensional repeatability. Think about maintenance windows, spare parts lead times, and whether you want a single-vendor stack or a best-of-breed mix.

Software and workflow — where projects stall (and how to unstick them)

Software often becomes the hidden bottleneck. If your slicer can’t be automated, or your CAD-to-print chain requires manual file juggling, throughput collapses. I’ve seen teams at Formnext in Frankfurt demo end-to-end workflows and realize integration was the missing piece; that kind of industry-level feedback matters. For on-site fixes that match your exact printers and ERP, consider targeted 3d printing software custom support so you don’t waste engineering hours reinventing connectors. Years of shop-floor work show that small automation scripts and consistent profiles beat raw horsepower every time.

Options to compare — short list, real differences

FDM desktop units: cheap, easy to maintain, wide material range — but watch tolerance and warping. Resin (SLA/DLP): superb detail and surface finish — post-processing takes space and time. Benchtop SLS: fewer supports, strong nylon parts — higher cost and service needs. Contract printing or local bureaus: great for low volume or prototype-heavy runs. Don’t confuse sticker price with total cost of ownership — energy, resins, maintenance, and staff training matter more than you think.

Common pitfalls users make and simple fixes

They buy the fanciest nozzle or resin without testing the actual material for the application — do a three-part trial (print, post-process, in-use test). They skip operator training — schedule a half-day workshop and reduce scrap. They ignore environmental controls — temperature and humidity change outcomes. They assume “desktop” means no maintenance — plan a spare-parts kit and a weekly checklist. Fix these and your uptime climbs fast.

How to choose support that fits your team

Match support to your in-house skills. If you have an engineer who loves scripting, give them API access. If you need predictable runs and minimal fuss, pick a vendor who will own profiles and updates. Ask any potential support partner for run-rate guarantees and a clear escalation path; vague answers mean you’ll be doing the heavy lifting later.

Wrap-up

Pick solutions around what your team does every day, not glossy spec sheets. Start with material and throughput needs, lock in software and profile support, then choose hardware that fits maintenance and space realities. For many small production teams the right mix of parts, software, and reliable local support ends up being a balance that makes sense with a partner like Wondermaker.


0 comments
0 FacebookTwitterPinterestEmail

Problem-first look

If you’re picking a supplier and still guessing on specs, you’re halfway to a coin toss. The usual mess starts with assuming price equals fit. I’ve worked with Kiwi moulders and packaging crews enough to spot that early — and saw the same debates show up at talks around the K trade fair in Düsseldorf — which is where big players line up their latest plastic additives and safety chat. That mismatch — want vs reality — is the problem we’ll break down and fix, step by step.

plastic additives

Top mistakes that keep biting teams

Picking on price alone. Trusting marketing claims without batch-level data. Skipping compatibility checks with your resin and downstream processes. Assuming one additive package suits every grade or mould. Expecting rapid formulation support from a supplier that’s really just a broker. Each mistake looks small until scrap rates, odour complaints or failed certification arrive.

Why those mistakes cost more than cash

Short-term savings can cost hours in line downtime, rework, and customer returns. A dodgy antioxidant or wrong processing aid changes melt flow, surface finish or colour stability. Compliance slips — traceability gaps or missing test data — slow approvals. You don’t just lose margin; you risk reputation with brand partners and regulators.

Smarter moves: practical vetting steps

Ask for technical dossiers by batch and request representative samples for your exact resin and cycle. Run a short pilot with the supplier’s recommended dosing, then tweak before full scale. Demand a problem-response SLA: who answers your chemist’s call at 3pm on a Friday? Verify supply-chain transparency — are raw materials regional, and can they show origin documentation? These are direct, testable checks, not vague conversations.

Tests and data that matter

Look for melt flow comparisons, thermal stabilisation curves, migration or odour screening tied to your end-use, and compatibility notes for pigments and fillers. Genuine suppliers provide processing windows and simple troubleshooting checklists. If they can’t back advice with lab data or clear pilot outcomes, treat their claims as marketing copy.

Viable alternatives, briefly weighed

Custom compounding gives control but adds tooling and inventory work. Masterbatch routes reduce complexity but can limit dosing flexibility. Off-the-shelf additive concentrates are fast and cheap, yet often miss niche needs. Match the option to your production scale and tolerance for change: small runs favour concentrates; high-spec medical or food parts push towards custom compounding with documented traceability.

Quick decision checklist you can use now

1) Can they furnish batch-specific test reports? 2) Have you trialled their package in your resin at production temperatures? 3) Is there a named technical contact and a clear escalation path? 4) Does their supply chain meet your audit requirements? 5) Do they provide stability projections for expected storage and processing? Answering those five keeps you out of most traps.

plastic additives

Wrap-up — clear endgame

Don’t gamble on good looks or cheap quotes. Solve the problem by demanding data, testing in your process, and insisting on supplier transparency. That gets consistent parts, fewer surprises and a cleaner audit trail. If you want a partner that shows batch data, technical backup and practical support without the usual fluff, consider how Shine Polymer fits into those requirements and your production flow.

0 comments
0 FacebookTwitterPinterestEmail

What operators actually want

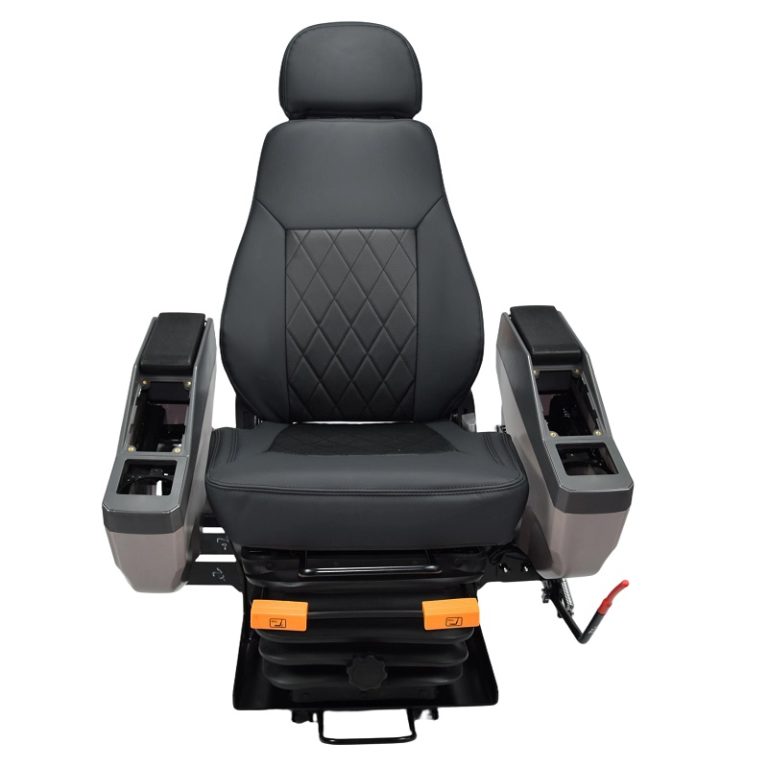
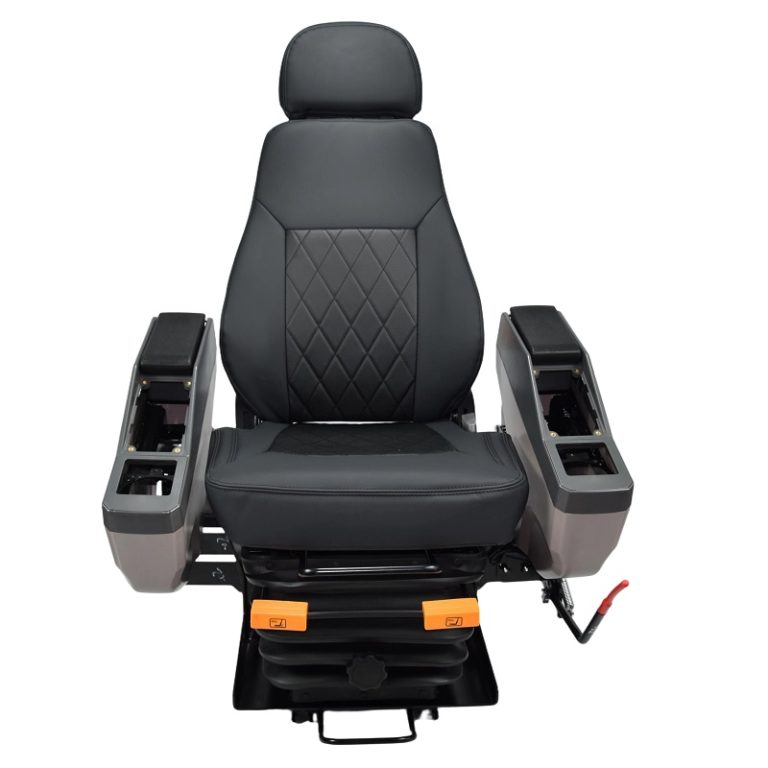
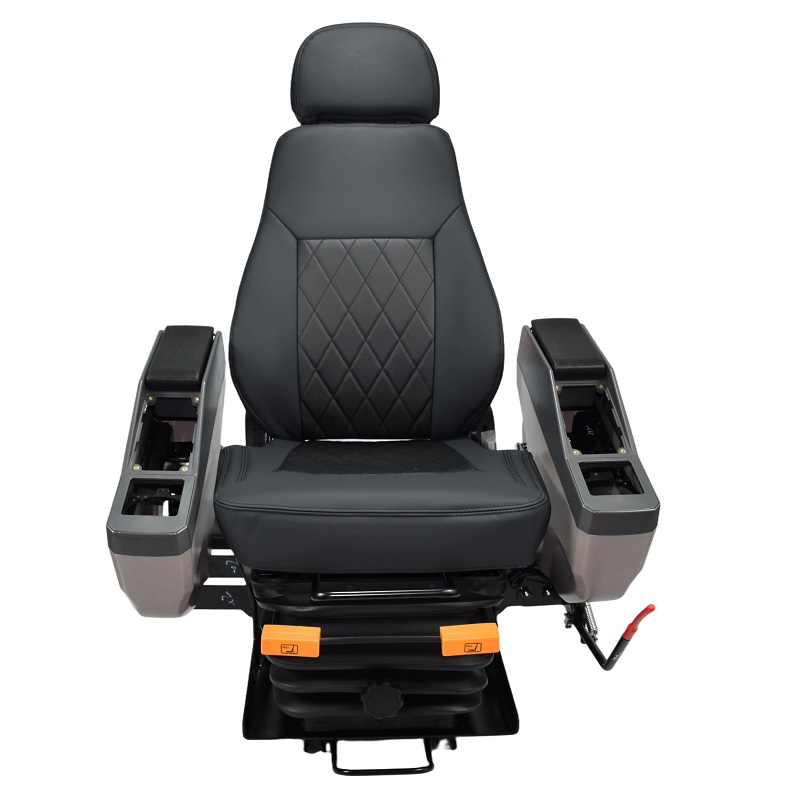
The operator needs comfort that holds up under dust, sweat and long hours — not a showpiece. Start by picturing the seat: the cushion giving a little, the suspension settling under weight, the slide rails clicking true. On a municipal excavation job outside Denver I watched a crew swap in a construction seat and the difference in operator posture was immediate. This article focuses on what matters to you: fit, secure mounting, and predictable ergonomics. Expect clear tips on mounting bracket alignment, seat pan orientation, and how to tune suspension and lumbar support for a single operator or a fleet.

construction seat

Prep: gather tools and verify fit

Lay everything out like mise en place. You’ll need a torque wrench, anti-seize compound, thread-locking medium, and the correct mounting bolts. Inspect the cab floor: measure hole patterns and compare to the seat base. Industry terms matter — note the seat’s suspension spec and slide rail spacing before you lift it in. A quick test-fit avoids wrestling in confined space later; the bolt holes should line up without forcing the unit, and the mounting bracket must sit flush against the floor plate.

Step-by-step installation that keeps ergonomics intact

Lift the seat into place with two people if it’s heavy; one-handed jams bend rails. Set the slide rails to mid-position so the operator can fine-tune later. Torque bolts in a star pattern to the manufacturer’s spec — consistent clamping prevents rattles and uneven wear. Connect electrical plugs for heating or suspension control last, tucking wires away from moving parts. Check lumbar support and adjust air spring pressure if the seat uses an air suspension: small changes alter comfort dramatically. The goal is repeatable positioning so every operator starts from the same baseline.

construction seat

Common mistakes and how to avoid them

Install errors are usually simple: wrong bolt grade, uneven torque, bent slide rails, or loose wiring. Avoid over-tightening — it strips threads and stresses the frame. Pay attention to the seat pan angle; too forward and the operator slides, too reclined and vision and control suffer. Test the seat with the operator wearing typical work boots and a tool belt — that changes how the suspension responds. And if you notice persistent vibration, check the shock absorber in the suspension, not just the cushion.

Choosing replacements: quick comparisons

Aftermarket choices fall into three practical camps: rugged vinyl with basic suspension, mid-level with enhanced lumbar and air-sprung cores, and premium air-suspension units with multi-axis damping. Consider maintenance load: simpler foam cushions are cheaper but need more frequent replacement; sealed air bladders resist moisture but require a service plan. If you’re evaluating fleets, compare total cost of ownership — initial price plus downtime for replacements. For operators who spend full shifts in the cab, investing in higher-grade heavy equipment replacement seats often returns faster in reduced fatigue and fewer complaints. Test-install one unit first before converting an entire fleet.

Operator checks and common tweaks

Once installed, run a checklist: seat fore/aft travel, recline range, lumbar adjustment, and any suspension presets. Have the operator do a 30-minute route or cycle to feel real-world vibration and pressure points. Adjust incrementally — a click or two of lumbar can change pressure distribution across the seat pan. If a fit issue persists, revisit mounting bracket alignment; small shims can correct misalignment without radical rework. – A quick on-the-job tweak sometimes beats returning the seat for replacement.

Three golden rules for evaluating seats

1) Secure anchoring: verify mounting bracket and bolt grade meet the vehicle load and local code. 2) Serviceability: choose seats whose suspension, cushion and electronics are modular for fast swaps. 3) Operator baseline: set a standard adjustment profile for every operator so performance comparisons are meaningful. These three metrics cut downtime, reduce back complaints, and make procurement decisions objective.

Think of replacements not as a cost center but as predictable uptime — and if you’re sourcing durable, well-documented units, you’ll land on solutions that work across models. Source One. –

0 comments
0 FacebookTwitterPinterestEmail

Vision of a calmer floor

The next wave of warehouse upgrades will feel less like a tech blitz and more like a careful exhale: machines that clean as they move, reducing clutter and friction across shifts. Imagine fleets of AMR-style cleaners slipping through aisles on scheduled passes — an autonomous cleaning robot that learns traffic patterns, avoids human pickers, and keeps floors dry and safe. This isn’t fanciful; Amazon’s 2012 acquisition of Kiva Systems is a real-world anchor showing how automation scaled in fulfillment centers, and cleaning automation follows that same scaling logic.

Benefit 1 — Safer floors, fewer stoppages

Cleaner robots cut slip-and-fall incidents by maintaining consistent water and detergent distribution, and by detecting wet zones with sensors. With LiDAR navigation and basic sensor fusion, an automated unit can avoid high-traffic windows and target problem zones rapidly. That matters: fewer stoppages mean conveyors and forklifts run on schedule, and safety incidents drop—measurable outcomes, not just talk.

Benefit 2 — Predictable labor allocation

When routine scrubbing shifts to robots, you free skilled staff for exceptions: equipment repair, quality checks, late-cycle orders. This reallocation improves throughput without adding headcount. Fleet management software schedules cleaning passes around peak picking windows, so human crews aren’t pulled away from cell tasks. Over time you measure this as more consistent task completion and better use of trained labor.

Benefit 3 — Cleaner appearance, steadier product protection

A cleaner floor reduces dust and particulate transfer to products, packing stations, and sensitive electronics. Regular passes by an auto scrubber floor machine cut particulate load that otherwise becomes a slow, costly problem—especially in high-turn environments handling electronics or food packaging. The result: fewer quality holds and less time lost to inspections.

Benefit 4 — Operational cadence and uptime

Robotic cleaners operate in predictable cycles, and their maintenance rhythms are easier to plan than ad-hoc deep cleans. Scheduled battery swaps or fast charging and modular brush heads simplify life for facilities teams. The machines are not flawless — expect occasional sensor tweaks or brush replacements — but these are repeatable, low-friction tasks that protect overall uptime.

Benefit 5 — Data-driven continuous improvement

Cleaning robots generate maps, heatmaps of spills, and pass/fail logs. That telemetry shows where spills happen most and when staffing patterns create hazards. Use that data to change rack layouts, adjust packing sequences, or modify shift overlap. The insight is practical: targeted adjustments instead of expensive, wholesale redesigns.

Implementation realities and alternatives

Choose between simple ride-on scrubbers and true autonomous scrubbers. Ride-on machines require dedicated operators; AMRs work autonomously but need robust mapping and clear signage in complex facilities. Consider a hybrid approach: fixed-route auto scrubber floor machine units for wide aisles, and small AMRs for narrow picking lanes. Don’t overlook battery infrastructure and spare-part inventories—neglect here leads to idle units and frustrated teams. —A small investment in modular batteries often prevents bigger operational headaches.

Common mistakes to avoid

Three pitfalls surface repeatedly: deploying robots without mapping human traffic, underestimating charge cycles, and failing to integrate cleaning logs into the broader facilities dashboard. Avoid siloed pilots. Instead, align cleaning schedules with peak picking data and maintenance windows so robots complement—not compete with—your operations.

Summary of practical takeaways

Cleaner machine robots deliver measurable safety gains, predictable labor use, product protection, higher uptime, and actionable data. Each advantage compounds: safer floors reduce stoppages, which keeps throughput steady and reveals new efficiency opportunities. These are not theoretical wins; they are operational improvements you can track and verify through metrics.

Three golden rules for selecting the right cleaner robot

1) Match navigation tech to complexity: choose LiDAR and robust mapping if aisles are narrow or layouts change often. 2) Demand clear uptime guarantees and easy serviceability—modular brushes and straightforward battery swaps matter. 3) Insist on telemetry access so cleaning logs feed your central dashboard for cross-functional decisions.

Rosiwit provides pragmatic solutions that fit these rules—machines designed for real shifts, simple service routines, and fleet tools that plug into facility operations. Final thought—start small, measure quickly, scale where the data shows real gains.

0 comments
0 FacebookTwitterPinterestEmail